I have a Highfield 330 Sport dinghy and I’ve been through a few dinghy tow harnesses. I now believe I have a solution that will stand the test of time, allowing all 3 attach points to be used for redundancy, and still allowing close control of where the dinghy tows behind the larger boat. This post details the design and provides photos of the end product, I hope it can be useful to others trying to solve the same problem.
Yes, that’s a new dinghy! Yes, I bought a tow harness when bought the dinghy. NO, the carabiners on that original tow harness did not fit onto the boat connections and even the replacements I first used were not up to the job, and stretched. Solving this problem right requires going full on Tim Allen on the carabiner size, moving up to some really good strong rope for the dinghy bridle, and selecting rope for the connection to tow boat that will stretch.
Wanting to do this right, instead of a 2 point connection for the dinghy, I have gone with 3, with the center connection always slack, only to take on load should one of the port/starboard connections fail. This will pull the dinghy toward the middle as it bounces around in the normal configuration, yet not pull the dinghy sideways, and likely sink it, or rip the cleats out of the back of the towing vessel if one of the side connections fails. I’ve never seen that happen, but the idea of it is pretty terrifying, so I’ll add that 3rd connection.
Update Feb 2025: Commenters have noted that not all dinghies have the same style connection. My Highfield has 3 very strong connection points, with the 2 outside being very strong and same as the center. Other brands only have a strong connection on the center, inspiring a change in the math below to make the center connector be primary.
While I’m pretty good at splicing 3 part rope, moving up to dyneema requires some special skills, so I have enlisted the paid support of the rigging specialists at West Marine main store in Fort Lauderdale. I provided specs on the length of lines, they built to spec and I must say, the outcome is pretty much spot on. The splice on the tow boat line is also impressive – I’m not sure how one splices a thimble into the middle of a rope, but here it is, done.
First problem, how long should the 3 bridle segments be from the dinghy to the attach point? The length from my prior dinghy harness was 6 feet and this worked pretty well, so stuck with it for the port/starboard connections. This time though, I’m adding a center connection and this is from a spot closer to the tow point, so it has to be shorter. How much shorter? Long enough that it will never take a load unless something else breaks, but as short as possible so that if it ever does take a load, it will tow the dinghy as near to straight as can be accomplished. Very little slack!
Here is a diagram of the dinghy’s three tow points. The two main points are at same position from forward/aft point of view and the center point is closer to the front. The forward point and the aft points are “same height” or close to it, so there is little to worry about from an up/down perspective changing the required length of the center connection.
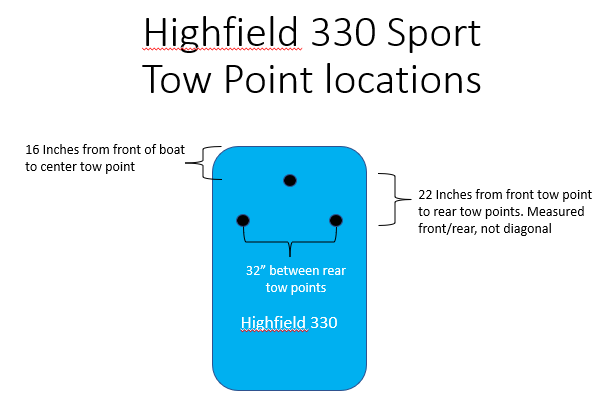
A side note on Metric vs. American. I know this will come up, so best to get ahead of it. The dinghy is a Highfield 330. That is METRIC, even though it seems to be off by a factor of 100. My tape measure however only knows inches, and feet, so that’s what I used for the measurements. I would prefer to use a cm tape measure, but unfortunately, I don’t have one of those. I’ll work on this. Back to the math…
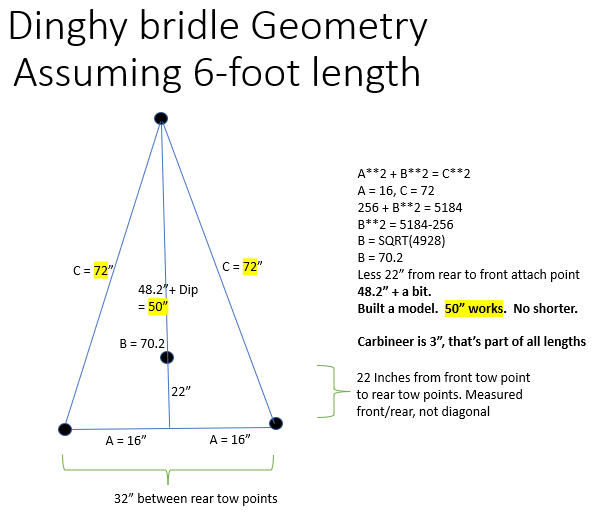
Broke out geometry and Pythagorean theorem to calculate the required length of the center connection.
a2 + b2 = c2, or as programmers prefer to write a**2 + b**2 = c**2.
With the side connections at 72″ and the middle connection 22″ ahead, the “same” length for the middle connection computes out to 70.2″, less the 22″ head start, equals 48.2″. We want a little slack – very little slack – so I had the middle line built at 50″ vs. the sides at 72. This provides 1.8″ of slack on the middle line, which worked out about perfectly. Details in the diagram that follows.
Update Feb 2025: If your dinghy has the strong connection point in middle, this becomes a minus vs. plus…
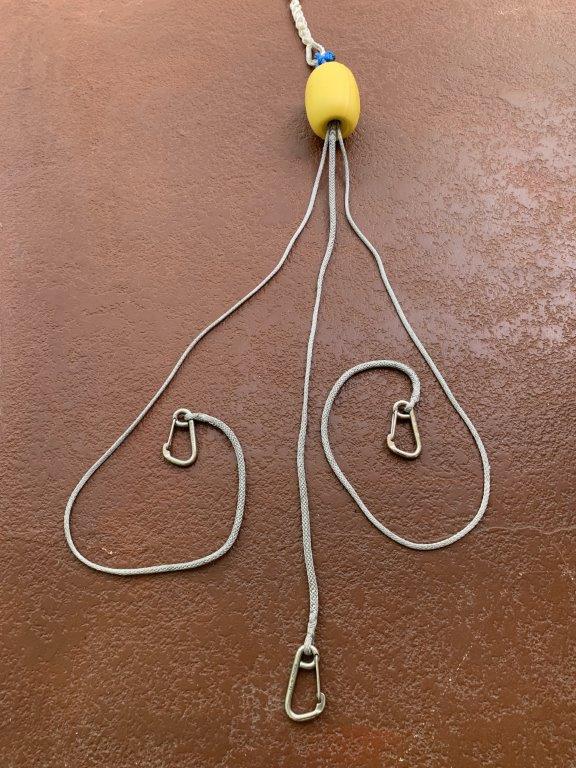
Adding a float on the front completes the assembly and it looks like this connected to the dinghy. Notice that the center connection is “loose”, the carabiner on its connection at the dinghy has a bit of slack. The end connections take all of the load and given this is dyneema, nothing should appreciably stretch.
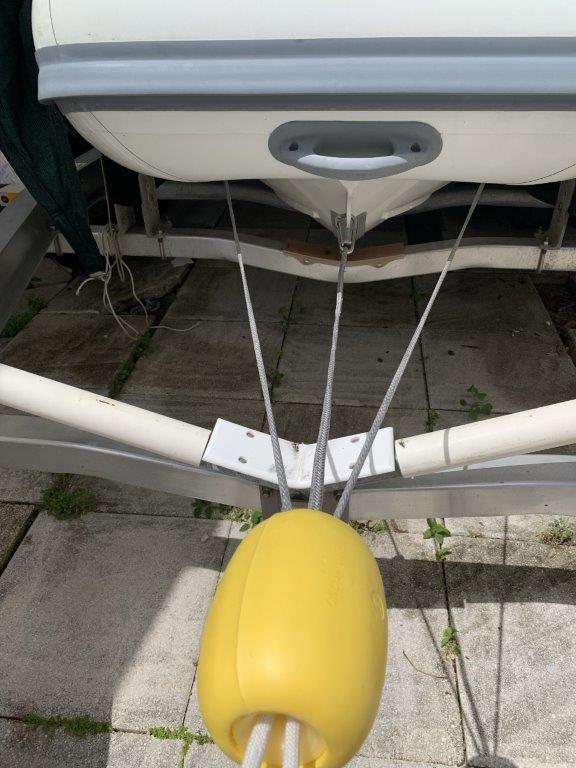
I add that this is 1/4″ dyneema and that’s pretty light, but according to wise people, this has a break strength well beyond the tow rope that will go from the dinghy bridle to the tow vessel. The connection points on this aluminum bottom Highfield are also pretty impressive, large and welded right into the foundation of the boat.
I have had trouble in the past though with carabiners stretching, so went with West Marine “4 inch” carabiner part number 274340. They aren’t giving these away! At $32.29 each, times 3, this adds up to nearly a 1/3rd of the full bill of materials.
The next photo shows what happens when one side fails…
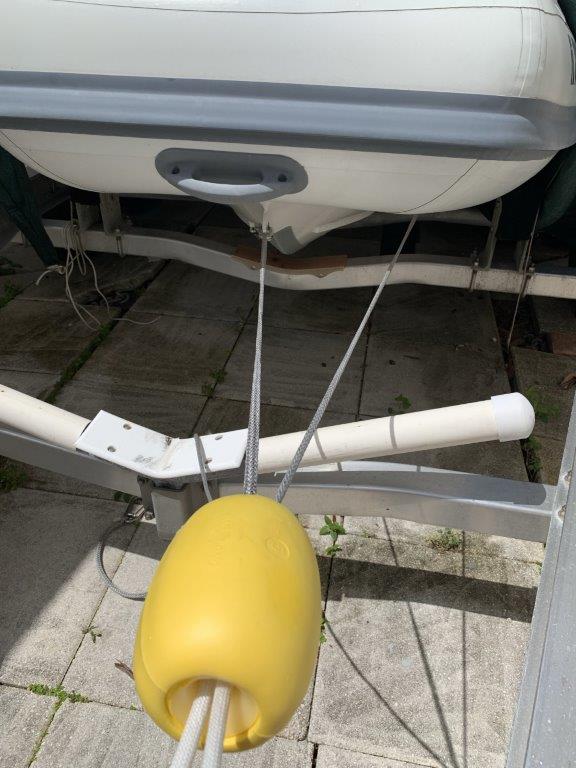
Notice with the starboard line disconnected, the load immediately transfers to the center, and port. Still being pulled by two cables, and still mostly “forward”. This is the goal of the 3rd connection. Keep it long enough so it isn’t involved in normal towing, but when one side fails, it immediately picks up the work and keeps the dinghy towing mostly “forward”.
Here is the dinghy bridle in one photo. The dyneema splices on the big carabiners are … clean. All go back to the tow point, where a float is added to keep the whole thing in front of the dinghy when not actively towing and keeping it from going deep when trying to get things disconnected. The full dinghy bridle is also “short enough” that even if we drive over it when disconnected from the tow boat’s tow line, the lines will not make it all the way back to the dinghy’s prop.
The next step is connection from the dinghy bridle to the tow boat bridle.

For the tow boat connection I like an equilateral triangle, which makes the normal pull be from both cleats, and when going through bridges, easy to pull the dinghy up tight on one side, without having to mess with the other side. This keeps the lines out of the props and keeps the dinghy close where it can’t get into mischief while waiting for bridges. Yes, it bangs into the tow boat during this maneuver, but it is inflatable, so no worries. You can even “back over it”, and the lines stay out of the props! Doing it again, I’d probably make this triangle “taller”, moving the dinghy away from the tow boat by another 5 or so feet. Still safe from ropes in propellers, but making the tow pull on the cleats more direct to the rear.
The 60 degree angle coming off the back of the boat in my case though makes the tow bridle not hit any railings, so it works. For these lines, I used 7/16″ nylon, which will stretch. And yes, when towing offshore, it will be wise to add 50 to 100 feet of additional line on the connection between the tow boat bridle and the dinghy bridle, or just raise it up on the dinghy lifter, which I’ll save for a later post.
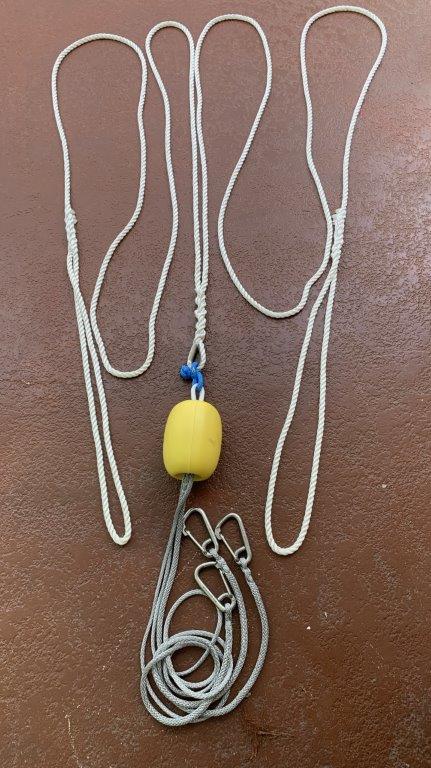
The full rig is in this photo. Notice that the eyes for cleat connection to boat are large; they are about 16″ going over 12″ cleats which is really unnecessary, but it makes it easy to connect and disconnect. The blue connect point is a dyneema soft shackle. I am suspicious of soft shackles, I’m not yet sure if this is a winner. It was much kinder to the wallet than the alternate solution of Tylaska Snap Shackle at $192.95. Time will tell how this decision plays out.
My concluding thought is a question. Why does it seem that everyone builds their own dinghy bridle? To take a stab at the answer, I expect the variety of connection points on dinghies make the “right” configuration a per-boat item. Bridles from mass product companies have to hit the majority consumer so really are not “right” for anyone. Boat widths vary, adding a 3rd connection point really messes up the mass market configuration. In the case of the bridle I purchased when got this boat, it was also too wimpy for the job.
In today’s case of this custom build, by taking careful measurements of the dinghy and adding some math for calculations of desired length of the middle connection, plus good help from the West Marine rigging shop (Thank you Charlie) the outcome is a dinghy tow harness that I expect will serve me well for a number of years.
Joe Nord
Pingback: Dinghy tow harness in action – joenord.com
Thanks for sharing this content! There’s not much out there in terms of guidance on how to rig a solid dinghy tow bridle and you’ve provided some much needed details… and the math takes it to the next level.. ;-). In my case, I have an AB Lammina AL and the side tow rings are up on the tubes. AB recommends the primary tension be on the center tow ring (down on the aluminum hull) with the side tow rings to be used more for stability. Just calling out, as you have, how different dinghy’s can have different towing towing harness configs… in my case the short line would be the central line, with the primary tension, with the two side lines having just a bit of slack to keep the boat riding stable.
Hey John, I’m about a year late replying to your comment but still do appreciate you taking the time to write. That’s 2 folks now recommending putting the primary load on the middle vs. my implementation on the sides. Interesting – thanks for commenting.