In pre-trip testing, discovered that the WifiRanger Apsen -> Dinali -> house WiFi was struggling to maintain a connection. Near constant power cycles were required to get a computer to connect. Debugged and concluded that the Dinali and likely also the newer Everest must be connected to the Aspen on LAN port #1, and learned more importantly, that LAN port #1 on the Aspen is the port labeled “4”.
Background
The WifiRanger “Aspen” is a small WiFi router that is “inside the boat” and connects to an “outside the boat” weather resistant “Dinali” or “Everest” for connection to the external WiFi source. From here on, I will discuss the Aspen and the Dinali as this is my configuration.
The brains of the operation is the little Aspen box and the remote piece is the Dinali. Both run the same software and both can individually do the job of acting as a WiFi router. The advantage of the dual configuration is that the Aspen (inside the boat) provides WiFi to the things inside the boat, and the Dinali (on top of the boat and unobstructed) takes care of the WiFi connection to the house, marina, RV park. Note that the Dinali being outside, is inside of a weather protected case and the Aspen being inside looks like a normal home WiFi router.
Back to todays debug
Observed behavior is that WiFi on the boat was “not reliable”. Can connect, but connection won’t stay up. It had been a couple months since last used and when logged into the Aspen’s web console, it said that a firmware update was available, would you like to install. Sure. Upgrade of firmware was conducted from 7.1.0b9 to 7.1.0b11 and nicely the tethered connection of the Aspen and Denali had both of them upgraded in a single go. No issues on the firmware upgrade, but it changed nothing for the connection staying alive.
Struggling to debug this on the boat, brought the Aspen home to debug it on a bench. Note that the Denali can’t really be removed without great effort. I had heard that using “port 1” was mandatory for the Aspen to Denali connection. This is also specified in the setup documents that came with the device. Image follows:
Experimentation on bench using an ethernet connection to house as the wide area connection showed a strange result. The labels on the Aspen for LAN 1 to LAN 4 are backwards! Easiest described in photo of my Aspen router. Looking close at the white case, you can see the 1..4 below the yellow LAN ports. I have fixed it with black Sharpie.
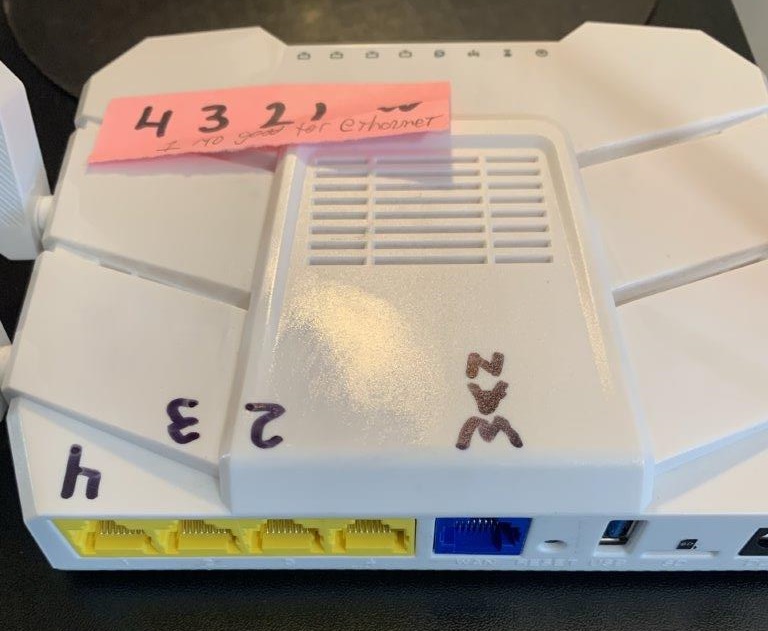
I tested connecting the Aspen to my house internet using ethernet and all of the Yellow and Blue ports. That is, LAN ports 1..4 and the WAN port. Each change required changing the Aspen setup configuration to specify which port was used for the Ethernet WAN connection. To my surprise, the LAN ports 1..4 according to the firmware do not match the LAN ports per the labeling on the Aspen case! I also observed that the Ethernet connection “worked” when in ports 4, 3, 2 and WAN, but did not work when plugged into LAN port #1. Note that this test done with the Aspen told that it doesn’t have a Denali in its configuration, so the Ethernet connection was not competing with the Denali for port 1.
Testing success case
Moved the Aspen back into the boat, turned off the ethernet wide area connection and turned on the Dinali – and connected the Denali to port #1, which is labeled “4”, and I’ve been up for 19 hours straight with zero issues.
Sharing the love here. Let me know if you see similar success and if you post a comment, send me an email (joe at this domain) to let me know so I can approve to the post and get it visible.
Joe Nord