In Part-1 of this series, I described the process of purchasing and installing a personal certificate. In my case, certificate was purchased from Entrust and I noted that once the purchase process was complete, the certificate exists for use in the Internet Explorer web browser, but that is all. With the purchase done, Microsoft Outlook will not yet utilize the certificate for purposes of S/MIME encrypted and signed email.
On Windows, there are multiple places where certificate are stored. Holding potentially private encryption keys, we don’t just put them anywhere, they are placed into a controlled access space where their usage can be limited. The operating system itself provides the primary storage location, but even this is more than one location. There is a machine wide certificate store and then a separate certificate store for each user.
The Windows certificate store is the store that is visible with Start / Run MMC.exe, Ctrl-M, Certificates and then you can browse. For purposes of a personal certificate needed for S/MIME, the certificate is stored in the USER store. It isn’t needed by any other user on the machine, so there is no need to elevate to admin to view the user certificates.
Take a look at the user certificate store
Press the Windows button to bring up the search bar, type “MMC” and Windows will respond with:

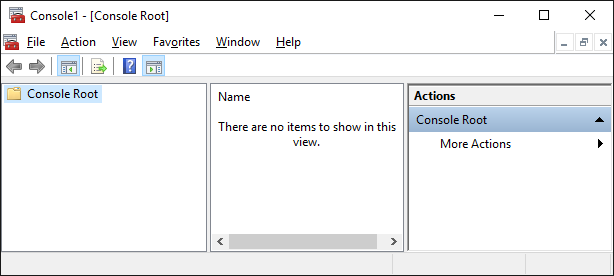
Click on “Run command” and the Microsoft Management Console (MMC) will be run with user privilege. The MMC is capable of loading numerous management “snap-ins” and with these can manage many different things on the computer. When it comes up, it is managing “nothing”.
We are interested in managing certificates. Ctrl-M brings up the add snap-in dialog, find Certificates on this list and presss “add”.
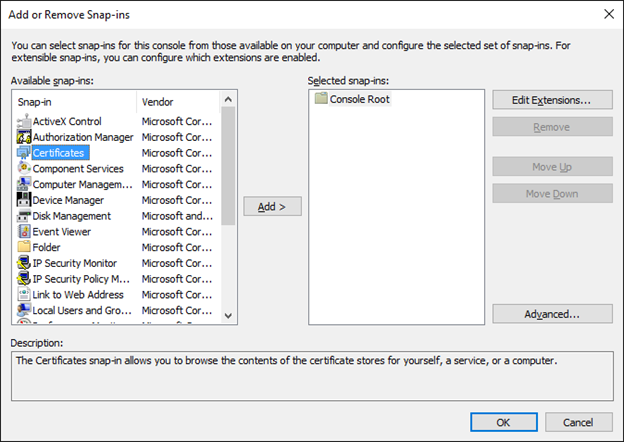
Since we run MMC on user privilege account, we are presented with no options on selecting machine level store or user store, we get the USER certificates. An interesting side note is that had we escalated to administrator access to certificates and then started browing the user certificates, we would be browsing the administrators certificates. This isn’t what we want, MMC was run on our normal user account, so we can see only the certificates for ourselves, and that is what we want.
Click on Personal and then Certificates and we get a listing of ALL of our personal certificates; in my case, there is only one.

Nice experiment, we have noticed that after installing the certificate into Internet Explorer, the certificate is automatically installed into THE Windows certificate store, in our user space.
Internet Explorer uses the Windows primary certificate store for web browsing so when the Entrust installer placed the certificate onto the computer, it landed here. Google Chrome also uses the system certificate store, so it too will benefit from being able to use certificates in web browsing. Recall that for me, the end game is S/MIME, so having now two web browsers capable of mathematically proving to web sites that Joe really is Joe, is completely uninteresting. In fact, most of the time I would prefer this not be possible, so there is something to be said for removing this certificate from the Windows certificate store. More on this later.
Firefox by contrast manages its own certificates. We could install the certificate into the Firefox certificate store. Alt-Tools, Options, Advanced, Certificates to get this started. Again, the goal is S/MIME email with Microsoft Outlook, so giving a certificate to Firefox to use with web browsing is not helpful.
Microsoft Outlook 2016
You would THINK that if Microsoft Internet Explorer uses THE Windows certificate store for its usage, that Microsoft Outlook would also use that store. You would think this, I would think this, we all would think this, but we would all be wrong.
Outlook has to be told that you have a certificate and you must import it. Here is a Microsoft article on how to do it, link. Quick version: When running Microsoft Office:File, Options and then down at the bottom, click on “Trust center”, Trust Center Settings, Email Security. Get a dialog that looks like this:
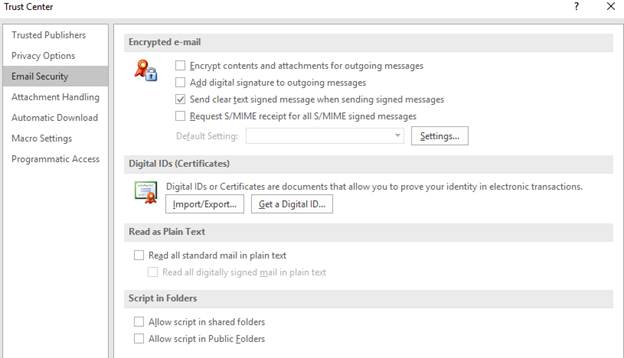
Click on “Import/Export…” and we can start the process of importing our personal S/MIME certificate into Microsoft outlook. Remember the USB drive that stored a copy of your certificate after purchase and the password you wrote down for the encryption of that private information in that backup, you will need those.
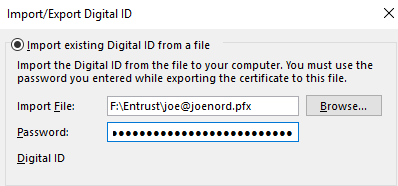
Complete that activity and get back to this screen
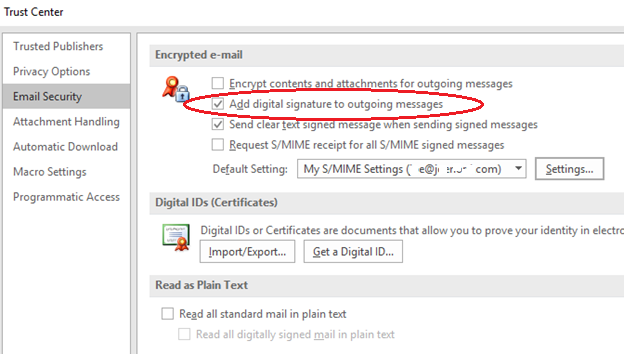
In my case, I checked the box to say “Add digital signature to outgoing messages”. In retrospect, that was a mistake, the vast majority of people I send email to from my personal email account have no idea what an S/MIME attachment is and this creates confusion. Since I can’t send them encrypted email anyway (they do not have a certificate), no big value in signing the message. Recommend leave this checkbox “off”.
Next, click on “Settings”
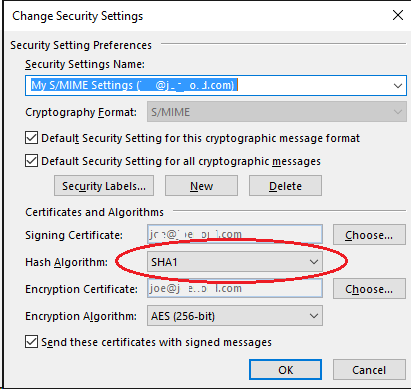
I just purchased this very fine personal encryption certificate, the certificate itself is signed with SHA2, but this dialog says I should sign my email messages using SHA1 Argh!!!!
NIST themselves have depreciated SHA1 and it is no longer FIPS 140-2 approved. SHA2 is vogue and since my personal certificate is signed with SHA2, anyone who receives anything from me by definition must be able to handle SHA2, so why is outlook defaulting to a lower form??? Change this to SHA256.
For for AES256, that’s peachy. Frankly, AES128 would be just fine, but 256 is also fine and with low quantity of encrypted mail I will be sending, it just doesn’t matter if it takes a few extra microseconds to do the math.
Send a signed message
Since I turned off the “sign all messages” box in options, the decision to sign any message now must be set as a function of sending an email. In the editing box of sending an email, the method to get it to do the signing is … hidden. Insert / Signature doesn’t do it – that is for text signatures placed at the end of the email message. What to do?
The answer is hidden in a very small pixel at the lower right of this box.
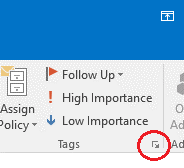
Yes- that little tiny box with an arrow. Click on that and this dialog pops up.
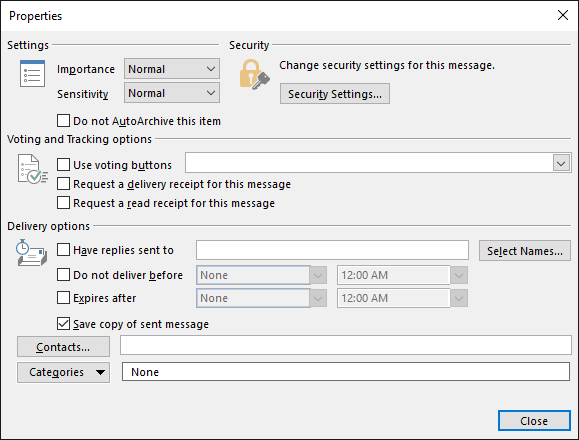
Click on “Security Settings”, and finally you can say “yes, sign this email message”.
Click on SEND and the email will be sent, signed.
ANYONE can receive your signed email, all they need is your PUBLIC key and this travels along with the S/MIME formatted email. Since that public key roots up to Entrust and since Entrust is part of the pre-installed set on every operating system, ANYONE who receives your message can do fancy math to verify that the message was indeed from you and since the signature checks out, they can also be sure that the message was not tampered along the way.
What they will not have is encryption of the message. To get that, they too would need a S/MIME certificate and that I will save for a follow up post. Link.
Joe Nord
(Originally published Jan 23 2016)
Pingback: Adventures in S/MIME – Getting a certificate – joenord.com